![]()
![]()
![]()
![]()
![]()
![]()
![]()
![]()
![]()
![]()
![]()
Care & Breeding of the Central American Wood Turtle
Rhinoclemmys
pulcherimma manni
Dr.
Mark R. Webb
Introduction
The wood turtles of the genus Rhinoclemmys are found throughout Central and northern South America, from Mexico and Panama in the north to Ecuador and Brazil in the south. Vetter (2005) lists nine species, three of which are also split into various subspecies. The different species vary quite considerably in their habits, with some being primarily aquatic (such as the black wood turtle R. funerea and spot-legged wood turtle R. punctularia), some being primarily terrestrial (such as the Mexican spotted wood turtle R. rubida) and some being semi-terrestrial (like the furrowed wood turtle R. areolata and the painted wood turtle R. pulcherimma).
Weiss (2006) reports that Rhinoclemmys pulcherimma is distributed along the western coast of Mexico and Central America, from Sonora to southern Costa Rica. There are actually four described subspecies of Central American wood turtle: the Guerrero wood turtle R. p. pulcherrima, the Honduran wood turtle R. p. incisa, the western Mexican wood turtle R. p. rogerbarbouri and the subject of this article, the Central American painted wood turtle R. p. manni. In terms of distribution, this is the southernmost of the subspecies. It is also the most colourful one.
Rhinoclemmys pulcherrima manni are variously known as Central American wood turtles, ornate wood turtles, painted wood turtles, Atlantic wood turtles or combinations of these names, such as Central American painted wood turtles. Buslady (2006) calls them ornate wood turtles, however both Highfield (1996) and Weiss (2006) use the name painted wood turtle, so this is the one used here.
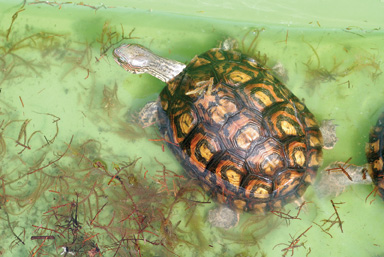
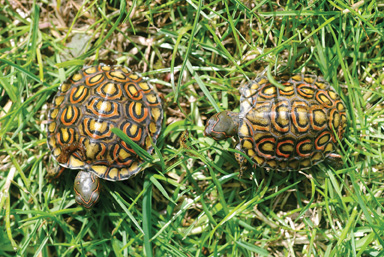
Painted wood turtles stay at quite a manageable size, with carapace lengths of up to circa 15cm in males and 20cm in females. They hail from humid forest and savannah type habitats, and although they are classed as terrestrial, rarely stray far from water. The background colour of their skin is a dark olive green, but this is decorated with an arrangement of various red to pinkish-red lines and stripes. The carapace is quite depressed in males, and domed in females. In both sexes, the brownish ground colour of the carapace is adorned with yellow and red concentric rings and black markings, giving a highly attractive overall appearance. Hatchlings and juveniles are patterned in exactly the same way, and are particularly colourful and brightly marked. Males seem to retain their colours well, but they do fade to a degree in females as they age. Males have much longer, thicker tails than females.
Captive husbandry
As this turtle hails from humid tropical central America, its captive environment must be sufficiently warm and humid. Ambient temperatures in the range of 22 – 26 ºC are adequate, together with a basking area at 32 – 35 ºC. Ambient humidity should be kept as high as possible. As mentioned above, the painted wood turtle is a semi-terrestrial species which is rarely found from water. Thus, the terrarium should reflect this. A shallow pond should be provided – large cat litter trays, the plastic trays which form the bases of small mammal cages, and horticultural seed or potting trays can all be suitable for this purpose. Water should be changed regularly, with weekly the minimum requirement. A handy tip is to use three identical trays. Two are placed within the terrarium, one inside the other. The third is filled with fresh water. Then when it is time to change the water, simply lift the uppermost tray out and replace with the tray of clean water. The first tray stays put, and there is no disturbance to the substrate. It is thus possible to change the water tray very quickly and cleanly. I usually use a proprietary veterinary disinfectant when I clean the dirty tray out, to ensure that harmful bacterial populations don’t build up; the turtles always defecate in the water!
Painted wood turtles are not at all shy, as long as they feel secure. I use a large all glass German-style terrarium, with built in ventilation and sliding glass doors (I block off much but not all of the ventilation to increase humidity). Large pieces of flat cork bark have been cut with a saw so that they can be wedged in vertically at the back, and in addition, a large number of plastic vivarium plants are attached to the back and side walls, so that they hang down. The combination of plants and cork is designed to increase the animals’ sense of security. On the outside, the back and sides of the terrarium is covered with a brownish textured wallpaper. This is surprisingly effective.
For substrate, I have tried various options, alone or in combination, including bark mulch, sterilised top soil, coco fibre, play sand, sphagnum moss and leaf litter. For me, the perfect blend is a mixture of around one third bark chips (proprietary brand used for terraria), one third live sphagnum moss (sold in garden centres for use in hanging baskets) and one third coco fibre (comes in a dry brick and is soaked and expanded in water prior to use). This is about 12cm deep. The turtles love to bury themselves totally in this substrate, with just their heads poking out. It retains moisture well, and doesn’t stick to them too much, and so the water remains clearer for longer. I keep the substrate moist but not saturated.
In addition to the cork and hanging plastic plants around the sides of the terrarium, I use one or two robust live plants in pots and driftwood branches for extra security. It is very important that the animals feel sufficiently secure when using the basking area – otherwise they won’t use it. A degree of experimentation is required to get this right.
Maintenance is limited to changing the water tray and spraying with tepid water heavily every evening. I have experimented with stopping off the ventilation so that the interior glass surfaces and plastic plants (but not the deep substrate) just dry out between sprayings. Because they defecate in the water, the substrate does not require changing more than a couple of times a year. Paul Eversfield, who also keeps these turtles (amongst many others) suggests adding a quantity of lumpwood charcoal to the substrate to help keep it ‘sweet’ for longer, although I have not tried this myself.
I utilise a 5% UVB fluorescent tube overhead and a good quality 60 watt basking spot bulb for lighting, connected to a dimming thermostat). The lights then plug into a time switch to come on for approximately 12 ½ hours per day. No additional heating is required in my warm reptile room. There are options for providing extra warmth in colder rooms, including adding a low wattage aquarium heater to the water tray, sticking a heatmat to the outside of a vivarium wall, or having an extra light fitting with a red bulb (the turtles can not see red light).
In my set up, the animals spend a lot of time in the water in spring and summer, and very little in autumn and winter. It is not known whether this behaviour is temperature related or relates to seasonal changes in behaviour in the wild.
Feeding
Without a shadow of a doubt, the most fun part of keeping manni wood turtles is feeding them. They are voracious. At first glance, their terrarium can appear empty – at this stage they are buried in the substrate. As soon they see that food is coming they start climbing out, march across the terrarium and sit begging for food.
Like most wood and box turtles, they are omnivorous, and will take a very wide range of food items. I feed adults about two or three times a week as follows:
Twice per week: Mixed ‘turtle salad’ comprising around 60% leafy greens including dandelions, chicory, water cress, leaf spinach, rocket, and ‘fancy‘ lettuces such as endive, escarole, frisee and lollo rosso. This is then supplemented with about 30% fruit including mushrooms, cucumber, tomato, peas, sweetcorn, grapes, banana, melon, kiwi, apple, blueberries, banana and strawberries. The final 10% is a proprietary turtle pellet food such as ZooMed Natural Aquatic Turtle Diet, Reptomin or Hikari Turtle Sticks. This is all roughly chopped, mixed and dusted liberally with calcium carbonate powder or a calcium supplement containing vitamins and minerals, such as Nutrobal.
Once every two or three weeks I place the turtles in a large tub of water at approx. 26ºC and 25cm water depth. I then feed live feeder insects liberally – literally as much as they can eat in half an hour or so. Insects used are primarily morio worms (Zoophobas morio, otherwise known as king or giant mealworms) and half-grown Argentine roaches (Blaptica dubia, which are cultured specifically for use as feeder insects). Like their salad, insects are dusted liberally with calcium supplements.
Breeding
When kept as described above, adult females will lay one or two very large, hard shelled, fertile eggs about every six weeks to eight weeks from October to April. The live food feeding protocol described is critical to obtaining fertile eggs because the deep warm water used for this is required for successful copulation. As important is the fact that the male does not attempt to copulate with the females outside of this time, and so, under this regimen, the females are not unduly stressed by his attentions and the sexes can be kept together. That said, other keepers have reported problems with the attentions of the male causing stress in females, and also with females producing infertile eggs. If either of these occurs, then keeping males separately may be advised, as is the case with Asian box turtles in the genus Cuora (e.g. Artner, 2006).
Although it is tempting, I do not feed the females more when gravid or after egglaying. The above feeding programme is sufficient. Extra feeding can promote more frequent egglaying and I prefer not to do this.
Egg incubation can be straightforward, but it can be tricky. Eggs are laid buried in the substrate. If oviposition is witnessed, the eggs are removed and placed in an incubator immediately. They are placed in washed plastic ‘cricket’ boxes, half buried in substrate from the main terrarium. Incubation at approximately 28 ºC takes around three and a half months, or 105 days. However, if egg laying is not witnessed, and the eggs are not removed within say 24 or 48 hours, they can enter a diapause (dormant) state where their development is delayed for up to six months. Thus, eggs can take up to nine and a half months to hatch. These eggs can look pretty awful by the time they reach the end of their incubation but, the trick is not to throw away any eggs that have not physically exploded or imploded!
Care of hatchlings and juveniles
As with the incubation of eggs, whilst this can be straightforward, it is not without its difficulties. Hatchlings are not removed from the incubator until their yolk sac has been absorbed. Then, they are placed in a small, shallow tray of water (25cm x 20cm) at approximately 26ºC and 2cm deep. The tray has strands of aquatic plant (I use Elodea egeria densa and water wisteria Hygrophila difformis) and floating aquatic plant (duck weed Lemna spp. or little plantlets of Salvinia) to create a planted, secure environment. A small flat piece of rock is used to create a resting and basking area which is just at water level. A small halogen desk lamp is used to create a slightly warmed (28 ºC), bright basking area.
For at least the first few feeds, the hatchlings will only take live food. I have the best success if I have lesser mealworms (buffalo worms; Alphitobius diaperinus) to hand. These little beetle larvae are like tiny mealworms, but more wriggly, initiating a feeding response. They will take half grown mealworms (mini-mealworms; Tenebrio molitor), especially white, freshly sloughed ones, but these don’t wriggle as much! Once they start feeding, other items, like defrosted bloodworm and newly born Argentine roach nymphs are taken. At first, all feeding is done using stainless steel feeding forceps. At some point over the first few weeks, the hatchlings will get bored of waiting for feeding time, and start munching on the aquatic plants. From then on, they are really quite hardy. They will take pretty much anything edible, and will beg for food from that point on!
Once they have outgrown their first tray, I upgrade to a cat litter tray and then progressively larger plastic tubs (with warmer basking spots) and then at some point, at perhaps twelve or eighteen months old, they can be switched to a more terrestrial set up as for the adults.
Of course, this particular method of raising the hatchlings is quite labour intensive and can not be the only way which works, but it has proved successful.
Painted wood turtles are still being imported from Nicaragua, but this can not and should not continue indefinitely, and so more people should try keeping and breeding these wonderful turtles…
References
Artner, H. (2006). Keeping and breeding of Pan’s box turtle Cuora pani pani Song, 1984 and Cuora pani aurocapitata Lou & Zong, 1988. In: Artner, H., Farkas, B. & Looehr, V. (Eds.) Turtles. Proceedings: International Turtle & Tortoise Sympoisim Vienna 2002. Edition Chimaira, Frankfurt.
Buslady (2006). House of the Wood Turtle – Buslady’s Ornate Wood Turtle Haven. www.freewebs.com/rpmanni/index.htm
Highfield, A. (1996). Practical encyclopaedia of keeping and breeding tortoises and freshwater turtles. Carapace Press.
Weiss (2006). Rhinoclemmys pulcherrima (Gray, 1855. Ornate Wood Turtle. www.chelonia.org
(c) 2010 Tortoise Trust